Basic
Examples
1
2
3
4
5
6
7
8
9
10
11
12
13
14
15
16
17
18
19
20
21
22
23
24
25
26
27
28
29
30
31
32
33
34
35
36
37
38
39
40
41
42
43
44
45
46
47
48
49
50
51
52
53
54
55
56
57
58
59
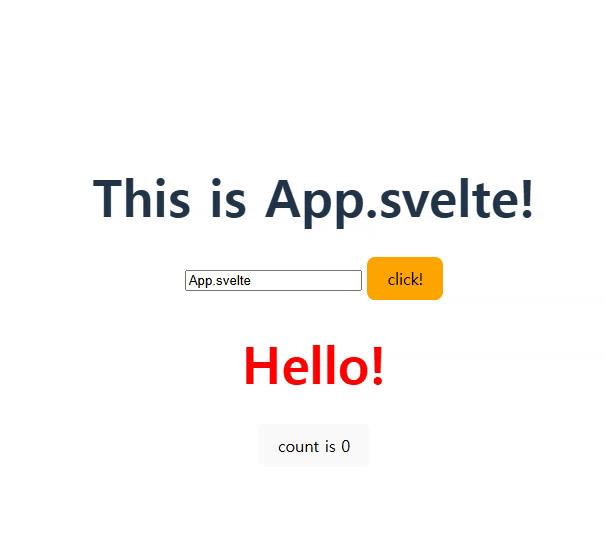
| <script>
// [Learn1]Imports content from another Svelte file.
// SvelteKit automatically makes files under `src/lib` available using the `$lib` import alias.(https://svelte.dev/docs/kit/$lib)
import Hello from '$lib/components/Hello.svelte'
import Counter from '$lib/components/Counter.svelte';
let name = "+page.svelte"
let isActive = false
// [Learn2]Declare functions
// In most JS/TS projects, it is a standard practice to declare functions using const
const change_name = () => {
name = "DS2Man"
isActive = true
}
</script>
<main>
<!--
[Learn3]Svelte Directive Type : Class Directive
1. Use curly braces to insert declared variables
2. This is an example where the class is applied conditionally based on a boolean value
-->
<h1 class:myactive={isActive}>
This is {name}!
</h1>
<!--
[Learn4]How to binding, One-way, Two-Way
1. Same as above, use curly braces to insert variables (no need for quotes)
2. This is an example of one-way data binding.
For two-way binding, you need to use `bind:`.
<input type="text" value={name}/>
-->
<input type="text" bind:value={name}/>
<!--
[Learn5]Event Handling
-->
<button
class="mybox"
style:background-color={isActive ? 'red' : 'orange'}
on:click={change_name}
on:mouseenter={()=>{name="DS2Man"}}
on:mouseleave={()=>{name="App.svelte"}}>
click!
</button>
<!-- Renders the Hello component -->
<Hello />
<!-- Renders the Counter component -->
<Counter />
</main>
<style>
h1.myactive {
color: blue;
}
</style>
|
- /src/lib/components/Hello.svelte
1
2
3
4
5
6
7
8
9
10
11
12
| <script>
</script>
<main>
<h1>Hello!</h1>
</main>
<style>
h1 {
color: red
}
</style>
|
- /src/lib/components/Counter.svelte
1
2
3
4
5
6
7
8
9
10
| <script>
let count = $state(0)
const increment = () => {
count += 1
}
</script>
<button onclick={increment}>
count is {count}
</button>
|
Result
Learn1. Imports content from another Svelte file.
In Svelte, it is common to split your application into multiple components for better reusability and maintainability.
To use a component defined in another .svelte file, you can import it using JavaScript’s import statement.
And svelteKit automatically makes files under src/lib available using the $lib import alias.(SvelteKit Docs)
1
2
3
4
5
6
7
| <script>
import Hello from '$lib/components/Hello.svelte'
</script>
<main>
<Hello />
</main>
|
Note. When working with Svelte, you’ll often see two different styles of import statements:
1
2
| `import App from '$lib/components/App.svelte'`
`import { fade } from 'svelte/transition'`
|
./App.svelte itself is a single component, so it is imported without curly braces {}.
1
2
3
4
5
| <!-- App.svelte -->
<script>
export default App;
</script>
|
- As shown in the example below, when multiple functions or features are exported, curly braces
{} are used to selectively import only what you need.
1
2
3
4
5
6
7
8
9
10
11
12
| // index.d.ts
declare module 'svelte/transition' {
export function fade(node: Element, { delay, duration, easing }?: FadeParams | undefined): TransitionConfig;
}
declare module 'svelte/store' {
export interface Writable<T> extends Readable<T> {
...
...
}
|
1
2
3
4
5
6
7
8
9
10
11
12
13
14
15
| <script>
import App from '$lib/components/App.svelte';
import { fly, fade } from 'svelte/transition';
import { writable } from 'svelte/store';
let isEvent = true;
export let name = writable('DS2Man');
</script>
<main>
<App />
<div in:fly= out:fade>
<button on:click={()=>(isEvent=false)}>X</button>
</div>
</main>
|
As I told you, the way you use the import statement depends on how the variables or functions are exported.
Let’s break this down with a simple example.
1
2
3
4
5
6
7
8
9
10
11
12
13
14
| // datas.js
const activity = [
{ id: 0, category: "News", },
{ id: 1, category: "Sports", },
];
const language = [
{ id: 0, category: "python", },
{ id: 1, category: "svelte", },
];
// export { activity, language }; // Case1.
// export { activity } // Case2.
export default activity; // Case3.
|
1
2
3
4
5
| <script>
// import { activity, language } from "./datas.js" // Case1.
// import { activity } from "./datas.js" // Case2.
import activity from "./datas.js" // Case3.
</script>
|
Learn2. Declare functions
In JavaScript (and Svelte), there are two common ways to declare functions:
- Function : This is the traditional way to declare a function:
1
2
3
4
5
6
7
| <script>
function greet() {
alert("Hello from Function Declaration");
}
</script>
<button on:click={greet}>Click Me</button>
|
- Arrow Function : This is a more modern and concise way to declare a function:
1
2
3
4
5
6
7
| <script>
const greet = () => {
alert("Hello from Arrow Function");
}
</script>
<button on:click={greet}>Click Me</button>
|
Learn3. Svelte Directive Type
Svelte provides directive syntax to easily handle events, classes, styles, transitions, and more, directly in your template. Here’s a simple table of the most commonly used directives:
| Directive Type | Syntax Example | Description |
|---|
| Class Directive | class:myactive={isActive} | Adds a class when the condition is true |
| Style Directive | style:color={textColor} | Dynamically applies an inline style |
| Event Directive | on:click={handleClick} | Runs a function when an event occurs |
| Bind Directive | bind:value={inputValue} | Two-way binding between a variable and an element |
| Transition Directive | transition:fade | Adds transition when the element enters/leaves |
| In/Out Directive | in:fade
out:fade | Applies animation when element appears/disappears |
| Animate Directive | animate:flip | Animates layout changes in lists or positions |
| Ref Directive | bind:this={element} | References a DOM element |
1
2
3
4
5
6
7
8
9
10
11
12
13
14
15
16
17
18
19
20
21
22
23
24
25
26
27
28
29
30
31
32
33
34
35
36
37
38
39
40
41
42
43
44
45
46
47
48
49
50
51
52
53
54
55
56
57
58
59
60
61
62
63
64
65
66
67
68
69
70
71
72
73
74
75
76
| <script>
import { fade } from 'svelte/transition';
import { flip } from 'svelte/animate';
let isActive = true;
let username = "";
let isVisible = true;
let items = [1, 2, 3];
let box;
function handleClick() {
alert('Button clicked!');
}
function toggleVisible() {
isVisible = !isVisible;
}
function shuffle() {
items = [...items].reverse();
}
</script>
<!-- Class Directive -->
<h1 class:myactive={isActive}>Hello!</h1>
<!-- Style Directive -->
<p style:color={isActive ? 'blue' : 'black'}>Text</p>
<!-- Event Directive -->
<button on:click={handleClick}>Click me</button>
<!-- Bind Directive -->
<input bind:value={username} placeholder="Enter your name" />
<p>Your name: {username}</p>
<!-- Transition Directive -->
<button on:click={toggleVisible}>Toggle Box</button>
{#if isVisible}
<div transition:fade>
I will fade in and out
</div>
{/if}
<!-- In Directive -->
{#if isVisible}
<div in:fade>
I will fade in
</div>
{/if}
<!-- Out Directive -->
{#if isVisible}
<div out:fade>
I will fade out
</div>
{/if}
<!-- Animate Directive -->
<button on:click={shuffle}>Reverse</button>
<ul>
{#each items as item (item)}
<li animate:flip>{item}</li>
{/each}
</ul>
<!-- Ref Directive -->
<div bind:this={box}>
This div is referenced by "box" variable.
</div>
<style>
h1.myactive {
color: red;
}
</style>
|
Directive Types
Learn4. How to binding, One-way, Two-Way
Binding is the process of connecting a variable (state) to an element’s property or value.
- One-way Binding : Data flows in one direction → from variable → to element
1
2
3
4
5
| <script>
let name = "DS2Man";
</script>
<h1>{name}</h1>
|
- Two-way Binding : Data flows both ways → variable ↔ element
When name changes → <input> value updates → Variable and Element are synchronized in real-time
1
2
3
4
5
6
| <script>
let name = "";
</script>
<input bind:value={name} />
<p>Your name is {name}</p>
|
Learn5. Event Handling
There are various types of event handling.
1
2
3
4
5
6
7
8
9
10
11
12
13
14
15
16
17
18
19
20
21
22
23
24
25
26
27
28
29
30
| <script>
let name = "App.svelte"
let isRed = false
const toggle = () =>{
isRed = !isRed
}
</script>
<main>
<h1>This is {name}!</h1>
<button
class="mybox"
style:background-color={isRed ? 'red' : 'orange'}
on:click={toggle}
on:mouseenter={()=>{name="DS2Man"}}
on:mouseleave={()=>{name="App.svelte"}}>
<h1>Button</h1>
</button>
</main>
<style>
.mybox {
width: 500px;
height: 150px;
background-color: orange;
}
</style>
|
Event Handling
Conditional Statements and Loops
Examples
1
2
3
4
5
6
7
8
9
10
11
12
13
14
15
16
17
18
19
20
21
22
23
24
25
26
27
28
29
30
31
32
33
34
35
36
37
38
39
40
41
42
43
44
45
46
47
48
49
50
51
52
53
54
55
56
57
58
59
60
61
62
63
64
65
66
67
68
69
70
71
72
73
74
75
76
77
| <script>
//////////////////////////////////////////////////////////////
// Variables and functions for Conditional Statements
let name = "App.svelte"
let count = 0
const increment = () => {
count = count >= 7 ? 0 : count + 1
// Alternative approach:
// count += 1
// if (count > 7){
// count = 0
// }
}
//////////////////////////////////////////////////////////////
// Variables and functions for Loop Statements
let fruits = [
{ id: 1, name: 'Apple' },
{ id: 2, name: 'Banna' },
{ id: 3, name: 'Cherry' },
{ id: 4, name: 'Orange' },
{ id: 5, name: 'Mango' }
]
// The spread operator expands the elements of an array.
// Example:
// const arr1 = [1, 2];
// ...arr1 returns 1, 2
const deletefruit = () => {
fruits = [...fruits.slice(0, 2), ...fruits.slice(3)];
}
</script>
<main>
<button on:click={increment}>
Click! (Count: {count})
</button>
<!-- [Learn1]Conditional Statements -->
{#if count <= 2}
<h1 class="myactive">Count: {count}, This is {name}!</h1>
{:else if count > 2 && count < 5}
<h1>Count: {count}, This is DS2!</h1>
{:else}
<h1>Count: {count}, This is DS2Man!</h1>
{/if}
<!-- [Learn2]Loop Statements -->
<button on:click={deletefruit}>
Delete Fruit (Length: {fruits.length})!
</button>
<!--
(fruit) here is a key identifier.
When items are added to the list, having a key helps render efficiently.
-->
{#each fruits as fruit (fruit.id)}
<li class:mycondition={fruit.id % 2 === 1}>
{fruit.name}
</li>
{/each}
</main>
<style>
h1 {
color: green;
}
.myactive {
color: blue;
}
.mycondition {
color: red;
}
</style>
|
Click Result
The structure overview
Conditionals and loops in Svelte use this structure:
- # to start
- / to end
- : for intermediate branches
Learn1. Conditionals Statements
{#if} ... {:else if} ... {:else} ... {/if} Statement
1
2
3
4
5
6
7
8
9
10
11
| <script>
let score = 85;
</script>
{#if score >= 90}
<p>Grade: A</p>
{:else if score >= 70 && score < 90}
<p>Grade: B</p>
{:else}
<p>Keep trying!</p>
{/if}
|
Learn2. Loop Statements
Looping with {#each ... as ...} ... {/each}
1
2
3
4
5
6
7
8
9
| <script>
let fruits = ['Apple', 'Banana', 'Cherry'];
</script>
<ul>
{#each fruits as fruit}
<li>{fruit}</li>
{/each}
</ul>
|
Using a Key for Efficient Updates.
(user.id) here is a key identifier. When items are added to the list, having a key helps render efficiently.
1
2
3
4
5
6
7
8
9
10
11
12
| <script>
let users = [
{ id: 1, name: 'Alice' },
{ id: 2, name: 'Bob' }
];
</script>
<ul>
{#each users as user (user.id)}
<li>{user.name}</li>
{/each}
</ul>
|
 Result
 Directive Types
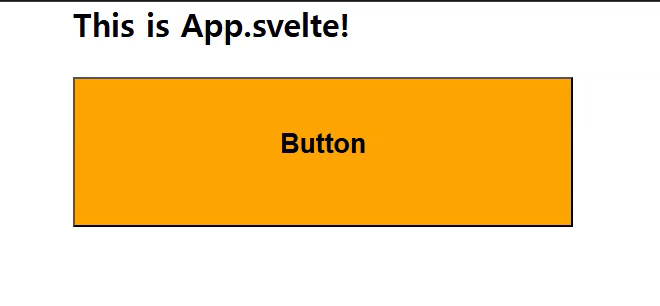 Event Handling
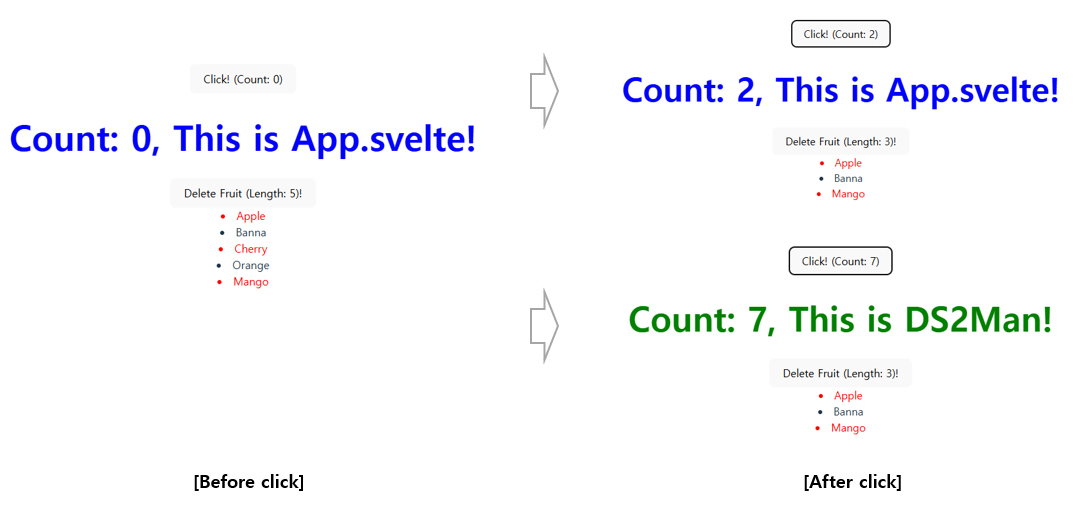 Click Result