Introduce FastAPI
Let's install and use FastAPI.
FastAPI is a Python-based web framework that has rapidly gained popularity over the past few years. Let’s explore the key features and advantages of FastAPI, as well as how to create a simple API using it.
What is FastAPI?
FastAPI is a modern web framework built on Python 3.7+ that offers high performance, ease of use, and automated documentation features. By leveraging Starlette and Pydantic, FastAPI enables high performance and powerful data validation. It particularly simplifies asynchronous programming and makes API development much more efficient.
Key Features of FastAPI
High Performance:
FastAPI runs on an ASGI server using Uvicorn, allowing natural use of asynchronous code for concurrent processing. This is one of the main reasons FastAPI boasts industry-leading performance.Automated Documentation:
FastAPI automatically generates API documentation through Swagger UI and ReDoc. Developers can easily provide API documentation without additional effort.Data Validation:
Using Pydantic, FastAPI strictly manages and validates the types of input data, which is crucial for enhancing the reliability and stability of APIs.Ease of Use:
FastAPI is designed for writing simple and intuitive code. It utilizes Python’s type hints to naturally define endpoints.
Installing and Using FastAPI
First, you need to install FastAPI. It can be easily installed using pip:
1
pip install fastapi uvicorn
uvicorn is an ASGI-compatible server used to run FastAPI applications. ASGI stands for Asynchronous Server Gateway Interface, and it’s a standard interface between web servers and applications that enables Python web frameworks to support asynchronous (async) functionality.
Creating Your First FastAPI Application
Let’s create a simple “Hello, World!” API:
1
2
3
4
5
6
7
8
9
10
11
12
13
14
15
from fastapi import FastAPI
import uvicorn

app = FastAPI()

@app.get("/")
def sample_task():
    return {
        "user_name": "ds2man",
        "message": "Hello, World!"
    }

if __name__ == "__main__":
    access_port = 9248
    uvicorn.run("main:app", host="127.0.0.1", port=access_port, reload=True)
In this code, the @app.get("/") decorator defines a function that is executed when a GET request is made to the root path. This function returns a JSON response .
This command runs the app object inside the main.py file, with the reload option enabling automatic server restart on code changes.
When building an API server with FastAPI, you can customize your app by adding metadata and adjusting documentation routes at the time of initialization.
1
2
3
4
5
6
7
8
9
10
11
12
13
14
15
16
17
18
19
20
21
22
23
24
25
26
27
from fastapi import FastAPI
import uvicorn

app = FastAPI(
    title="Study FastAPI",
    summary="DS2Man API",
    version="1.0.0",
    contact={
        "name": "ds2man",
        "email": "jaoneol@gmail.com",
        "url": "https://ds2man.github.io/"
    },
    docs_url='/docs',
    redoc_url='/redoc',
    openapi_url='/openapi.json'
)

@app.get("/")
def sample_task():
    return {
        "user_name": "ds2man",
        "message": "Hello, World!"
    }

if __name__ == "__main__":
    access_port = 9248
    uvicorn.run("main:app", host="127.0.0.1", port=access_port, reload=True)
Viewing the API Documentation
Once the server is running, you can open your browser and navigate to http://127.0.0.1:8000/docs to view the automatically generated Swagger UI documentation.
You can also access ReDoc documentation at http://127.0.0.1:8000/redoc.
Now, let’s take a look and compare the customized API UIs we configured earlier.
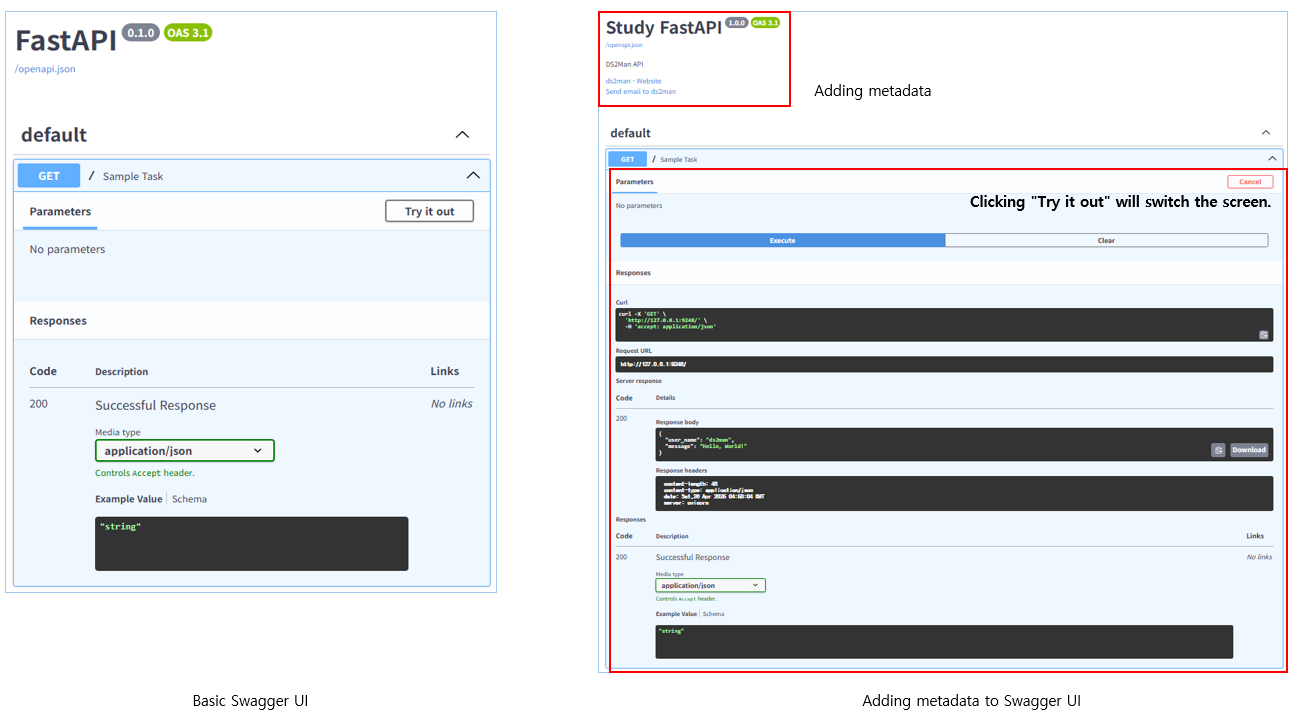 API Documentation
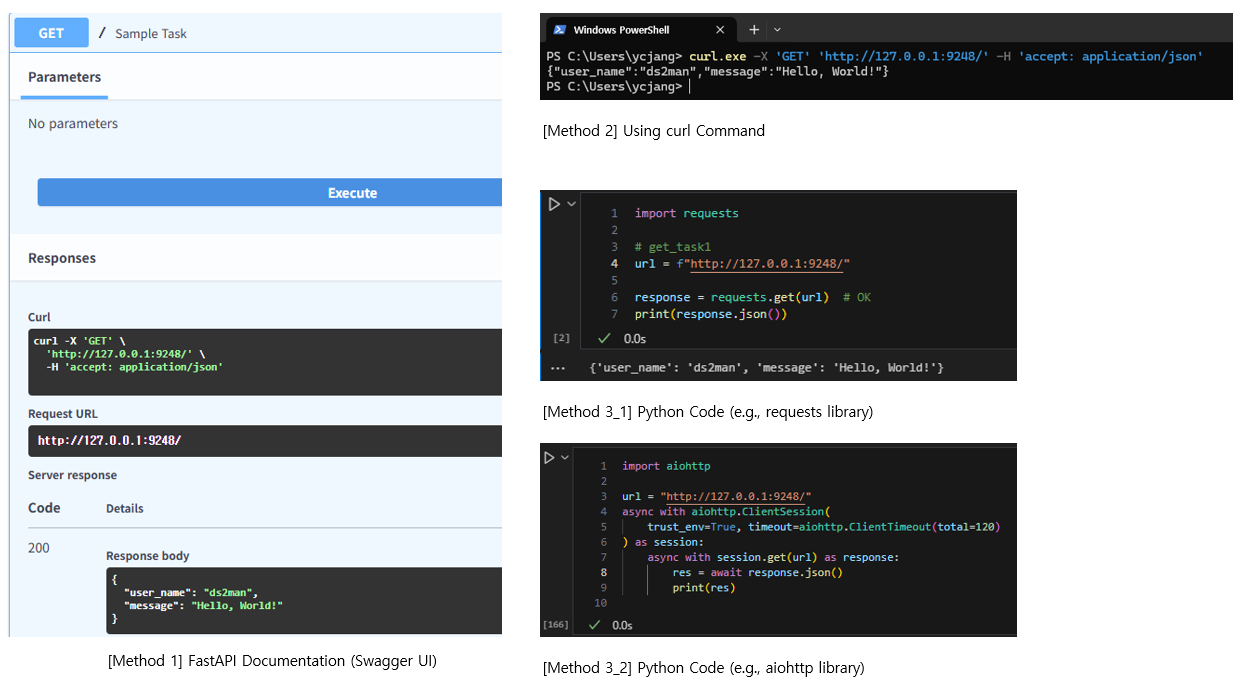
How to Test FastAPI
When developing with FastAPI, there are three main ways to test your API endpoints:
- FastAPI Documentation (Swagger UI)
- Using
curlCommand
In Windows PowerShell, thecurlcommand is not recognized as the realcurl
If you want to use it like on Linux or Mac, you can directly call the built-incurl.exethat comes with Windows.
curl.exe -X 'GET' 'http://127.0.0.1:9248/' -H 'accept: application/json'
1
2
3
4
5
# Linux
curl -X 'GET' 'http://127.0.0.1:9248/' -H 'accept: application/json'

# Windows
curl.exe -X 'GET' 'http://127.0.0.1:9248/' -H 'accept: application/json'
- Python Code (e.g.,
requestslibrary)
1
2
3
4
5
6
import requests

url = f"http://127.0.0.1:9248/"
response = requests.get(url)
res = response.json()
print(res)
- Python Code (e.g.,
aiohttplibrary)
1
2
3
4
5
6
7
import aiohttp

url = "http://127.0.0.1:9248/"
async with aiohttp.ClientSession() as session:
    async with session.get(url) as response:
        res = await response.json()
        print(res)
 How to Test FastAPI
Advantages of FastAPI
Rapid Development:
FastAPI allows developers to quickly learn and start working, significantly improving the initial development speed of a project.Automatic Data Validation:
Since data validation is performed automatically, errors are reduced, and the readability and maintainability of the code are greatly improved.Strong Community Support:
FastAPI has an active community and rich documentation, making it easier for developers to find solutions to problems.Asynchronous Support:
FastAPI natively supports asynchronous processing, which is highly useful for applications that need to handle large volumes of traffic.
Conclusion
FastAPI is an incredibly useful tool for developing APIs in Python, offering high performance, ease of use, and automated documentation features. It can be a huge asset, especially for projects where rapid development and asynchronous support are critical.